Welcome to Cortico's Knowledge Base
Official Cortico Product information for customers and users.

Cortico Oscar Plug-In
Plug-in: Quick Actions
Learn how to use the Quick Actions menu to cut down on repetitive clicks.
Updated 2 weeks ago
Finding the Quick Actions Menu
1. Make sure the Cortico Plug-in is installed, then login to OSCAR.
2. Take a look at the bottom right corner of the day sheet. You may see the Quick Actions menu floating above the blue Cortico button.
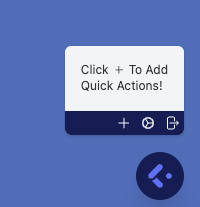
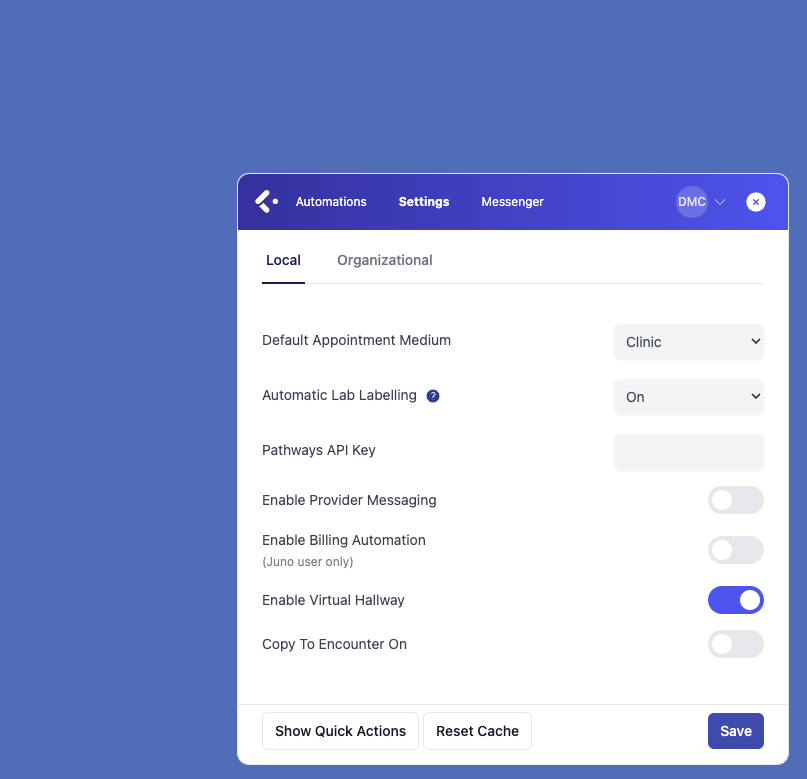
3. If you don't see this menu, click on the blue Cortico button to open the main Plug-in Screen. Then, click "Settings" on the top nav bar.
4. On the bottom left of the "Settings" page, you will see a button titled "Show Quick Actions". Click this to reveal the Quick Actions menu.
Adding Quick Actions
1. Click the "+" icon on the Quick Actions menu to add a new shortcut. You will be prompted to choose between creating a new External Link or a New Saved Reply.
Adding External Links
1. After clicking the "+" icon, select the External Link option from the pop-up.
2. Add the URL that you would like to link to, and a short, easy-to-remember name for this link.
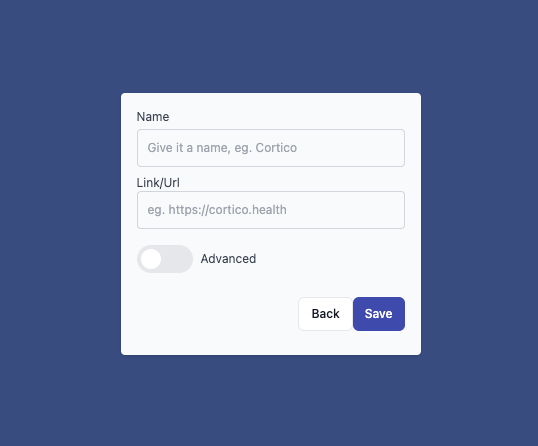
3. Click "Save". The link will now appear on the Quick Actions menu. Clicking it will open the link in a new tab or window. We recommend using this feature to quickly access eForms that you commonly use.
Adding an e-Form External Link
Through the external link feature, you can add an e-Form to the plug-in for quick creation with the patient's details pre-populated. To enable this, you will need to retrieve the URL of the e-Form and edit it.
Add a new e-Form for a patient from the e-Chart by clicking '+' on the e-Form section, then selecting your e-Form of choice.
Copy the URL of the e-Form from the navigation bar
Edit the URL as follows, ensuring that "demographic_no" is followed by ={{demographic_no}}, and "appointment" is followed by =null
Open the quick actions menu and add a new external link, copying in this new link and naming it a preferred name of your choice.
This will allow you to open a new window/tab with an e-Form ready to fill out for the patient whose e-Chart is open, upon clicking this link. If you need any help setting this up, please feel free to reach out to help@cortico.health with the name of the e-Form you would like the URL created for.
Adding Saved Replies
1. After clicking the "+" icon, select the New Saved Reply option from the pop-up. NOTE: you must be logged in to the plug-in for this feature to work.
2. Select a saved reply template from the menu that appears. You will then have the opportunity to alter the template and subject line, as well as add a short, easy-to-remember name for this quick action. Then, click save.
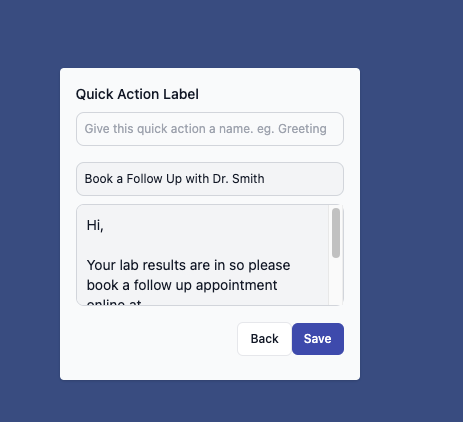
3. The Saved Reply will now appear on the Quick Actions menu. While in a patient's encounter notes screen, click this shortcut to quickly write them the corresponding message.
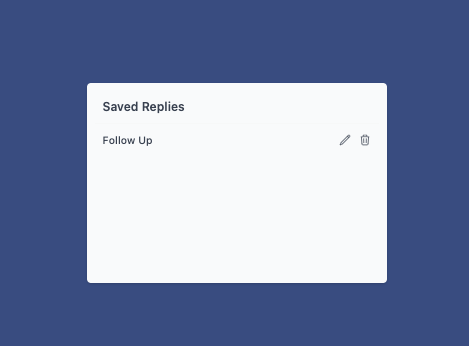
Editing and Deleting Quick Actions
1. Click the gear icon on the Quick Actions menu to edit or delete your Quick Actions.
2. Use the pencil to edit quick actions, or click the bin icon to delete them.
Hiding the Quick Actions Menu
1. Click the "Leave" icon (door with arrow) to hide the Quick Actions menu.
2. It can be reopened again at any time by following the steps above.
Send Rx Quick Action
This feature no longer relies on Quick Actions to be enabled. Learn more about it here